VM resize (Windows): Difference between revisions

From MediaWiki
Jump to navigation Jump to search
No edit summary
No edit summary
Line 1: Line 1:
<tabber>
<tabber>
|-|VM resize CLI=
|-|VM resize CLI =
= Overview =
This page describes the steps for resizing a VM via CLI.


= VM Resize =
== VM Resize - OpenStack CLI Installation ==
To use OpenStack CLI, you need to install the OpenStack CLI Client for your OS:
<syntaxhighlight lang='bash'>
# Fedora
dnf install python3-openstackclient
# Debian / Ubuntu
apt install python3-openstackclient
</syntaxhighlight>
The official installaton guide can be found on [https://docs.openstack.org/mitaka/user-guide/common/cli_install_openstack_command_line_clients.html docs.openstack.org].
== VM Resize - OpenStack client environment script (OpenRC file) ==
To increase efficiency of client operations, OpenStack supports simple client environment scripts also known as OpenRC files. These scripts typically contain common options for all clients, but also support unique options.
You may download such an OpenRC file from the [https://dashboard.stoney-cloud.com/ dashboard].
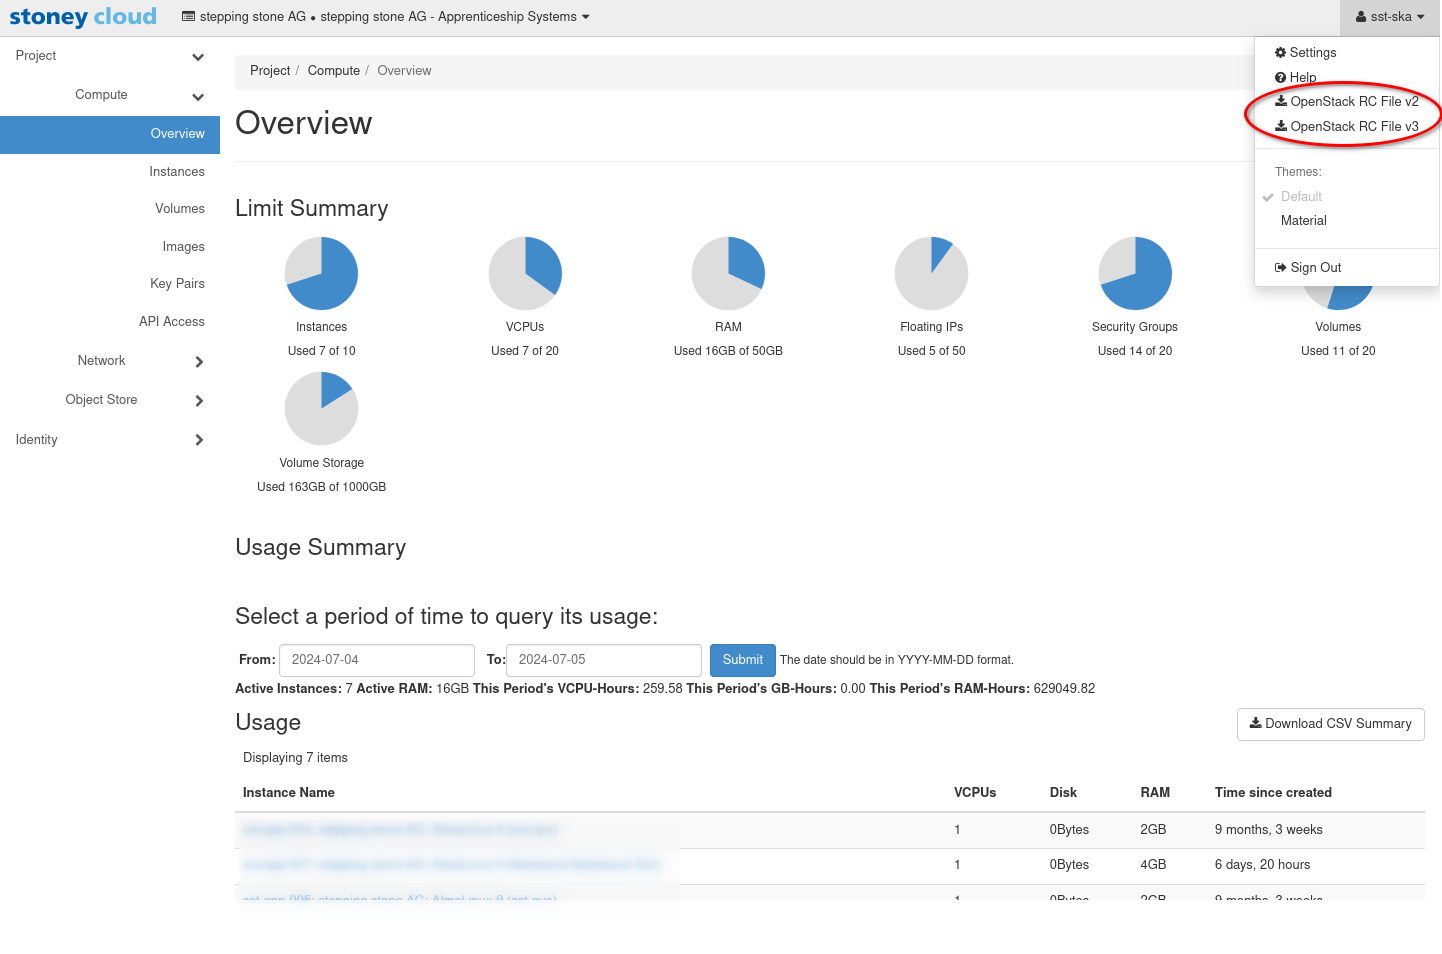
After logging into the [https://dashboard.stoney-cloud.com/ dashboard], click on your user name in the upper right corner and choose the menu option «OpenStack RC File v3» and save it the desired location on your local machine. As you can have multiple OpenRC files, we recommend to use a sub directory. For example <code>openrc</code> in your home directory.
[[Image:OpenStack_RC_File_v3.png]]
Source the OpenRC file specific to this project (use single quotation marks to avoid problems with spaces in the file name):
<syntaxhighlight lang='bash'>
source ${HOME}/openrc/'Project Name-openrc.sh'
</syntaxhighlight>
After you sourced the file, you need to enter a password:
<syntaxhighlight lang='text'>
Please enter your OpenStack Password for project Project Name as user user:
</syntaxhighlight>
Check if you have access to the OpenStack API by listing the API endpoints:
<syntaxhighlight lang='bash'>
openstack catalog list
</syntaxhighlight>
Expected output:
<syntaxhighlight lang='text'>
+------------+-----------+--------------------------------------------------------------------------------------------------+
| Name      | Type      | Endpoints                                                                                        |
+------------+-----------+--------------------------------------------------------------------------------------------------+
| glance    | image    | duedingen-production                                                                            |
|            |          |  internal: https://glance.ctrl-int.os.stoney-cloud.com:9292                                    |
|            |          | duedingen-production                                                                            |
|            |          |  public: https://api.os.stoney-cloud.com:9292                                                  |
|            |          | duedingen-production                                                                            |
|            |          |  admin: https://glance.ctrl-int.os.stoney-cloud.com:9292                                        |
[...]
| cinderv2  | volumev2  | duedingen-production                                                                            |
|            |          |  internal: https://cinder.ctrl-int.os.stoney-cloud.com:8776/v2/616812eda14e44de89138f3377841187 |
|            |          | duedingen-production                                                                            |
|            |          |  admin: https://cinder.ctrl-int.os.stoney-cloud.com:8776/v2/616812eda14e44de89138f3377841187    |
|            |          | duedingen-production                                                                            |
|            |          |  public: https://api.os.stoney-cloud.com:8776/v2/616812eda14e44de89138f3377841187              |
|            |          |                                                                                                  |
+------------+-----------+--------------------------------------------------------------------------------------------------+
</syntaxhighlight>
== VM Resize - List existing flavours ==
After sourcing your openrc file, you can use the following command.
<syntaxhighlight lang='bash'>
openstack flavor list
</syntaxhighlight>
This will list all available flavors. If you wish to have a flavor with <code>3 CPU's</code> and <code>6 GB Memory</code> this would result in the flavor <code>Standard Düdingen c003m0006</code>. In order to list this flavor you can use the <code>grep</code> command:
<syntaxhighlight lang='bash'>
openstack flavor list | grep c003m0006
</syntaxhighlight>
which should give you the following output:
<syntaxhighlight lang='bash'>
| 3359ede6-3471-4a50-9830-00687b942b9f | Standard Düdingen c003m0006        |  6144 |    0 |        0 |    3 | True      |
</syntaxhighlight>
== VM Resize - Prepare the variables and execute the flavour upgrade ==
<syntaxhighlight lang='bash'>
flavor_id=<FLAVOR ID>        # Example: 3359ede6-3471-4a50-9830-00687b942b9f
server_id=<YOUR SERVER ID>  # Example: 15ba6096-1527-4b9e-9577-f5d070120b35
# Make sure that you have the correct server
openstack server show ${server_id}
# Resize (please be aware, that the VM gets rebooted automatically)
openstack server resize --flavor ${flavor_id} ${server_id}
# Check the state (it should be RESIZE and change to VERIFY_RESIZE)
openstack server show --column status ${server_id}
# Now you need to confirm
#openstack server resize --confirm ${server_id}
openstack server resize confirm ${server_id}
# Check the state (it should now be ACTIVE again)
openstack server show --column status ${server_id}
# Verify the new flavor
openstack server show --column name --column flavor ${server_id}
</syntaxhighlight>
|-|VM resize Dashboard=
|-|VM resize Dashboard=
= Overview =
= Overview =

Revision as of 13:05, 1 July 2024

Overview

This page describes the steps for resizing a VM via CLI.

VM Resize

VM Resize - OpenStack CLI Installation

To use OpenStack CLI, you need to install the OpenStack CLI Client for your OS:

# Fedora
dnf install python3-openstackclient
# Debian / Ubuntu
apt install python3-openstackclient

The official installaton guide can be found on docs.openstack.org.

VM Resize - OpenStack client environment script (OpenRC file)

To increase efficiency of client operations, OpenStack supports simple client environment scripts also known as OpenRC files. These scripts typically contain common options for all clients, but also support unique options.

You may download such an OpenRC file from the dashboard.

After logging into the dashboard, click on your user name in the upper right corner and choose the menu option «OpenStack RC File v3» and save it the desired location on your local machine. As you can have multiple OpenRC files, we recommend to use a sub directory. For example openrc in your home directory.

OpenStack RC File v3.png

Source the OpenRC file specific to this project (use single quotation marks to avoid problems with spaces in the file name):

source ${HOME}/openrc/'Project Name-openrc.sh'

After you sourced the file, you need to enter a password:

Please enter your OpenStack Password for project Project Name as user user:

Check if you have access to the OpenStack API by listing the API endpoints:

openstack catalog list

Expected output:

+------------+-----------+--------------------------------------------------------------------------------------------------+
| Name       | Type      | Endpoints                                                                                        |
+------------+-----------+--------------------------------------------------------------------------------------------------+
| glance     | image     | duedingen-production                                                                             |
|            |           |   internal: https://glance.ctrl-int.os.stoney-cloud.com:9292                                     |
|            |           | duedingen-production                                                                             |
|            |           |   public: https://api.os.stoney-cloud.com:9292                                                   |
|            |           | duedingen-production                                                                             |
|            |           |   admin: https://glance.ctrl-int.os.stoney-cloud.com:9292                                        |
[...]
| cinderv2   | volumev2  | duedingen-production                                                                             |
|            |           |   internal: https://cinder.ctrl-int.os.stoney-cloud.com:8776/v2/616812eda14e44de89138f3377841187 |
|            |           | duedingen-production                                                                             |
|            |           |   admin: https://cinder.ctrl-int.os.stoney-cloud.com:8776/v2/616812eda14e44de89138f3377841187    |
|            |           | duedingen-production                                                                             |
|            |           |   public: https://api.os.stoney-cloud.com:8776/v2/616812eda14e44de89138f3377841187               |
|            |           |                                                                                                  |
+------------+-----------+--------------------------------------------------------------------------------------------------+

VM Resize - List existing flavours

After sourcing your openrc file, you can use the following command.

openstack flavor list

This will list all available flavors. If you wish to have a flavor with 3 CPU's and 6 GB Memory this would result in the flavor Standard Düdingen c003m0006. In order to list this flavor you can use the grep command:

openstack flavor list | grep c003m0006

which should give you the following output:

| 3359ede6-3471-4a50-9830-00687b942b9f | Standard Düdingen c003m0006         |   6144 |    0 |         0 |     3 | True      |

VM Resize - Prepare the variables and execute the flavour upgrade

flavor_id=<FLAVOR ID>        # Example: 3359ede6-3471-4a50-9830-00687b942b9f
server_id=<YOUR SERVER ID>   # Example: 15ba6096-1527-4b9e-9577-f5d070120b35

# Make sure that you have the correct server
openstack server show ${server_id}

# Resize (please be aware, that the VM gets rebooted automatically)
openstack server resize --flavor ${flavor_id} ${server_id}

# Check the state (it should be RESIZE and change to VERIFY_RESIZE)
openstack server show --column status ${server_id}

# Now you need to confirm
#openstack server resize --confirm ${server_id}
openstack server resize confirm ${server_id}

# Check the state (it should now be ACTIVE again)
openstack server show --column status ${server_id}

# Verify the new flavor
openstack server show --column name --column flavor ${server_id}

Overview

This page describes the steps for resizing a Windows VM via horizon Dashboard.

VM Resize

VM Resize - Login via Dashboard

Log in to the stoney cloud dashboard with the credentials you have received from us.

Debian VM Creation Dashboard manual 01.png

VM Resize - Launch Instance - Preperations

1. Select the appropriate project from the drop down menu at the top left.

2. On the Project tab, open the Compute tab and click Instances category.

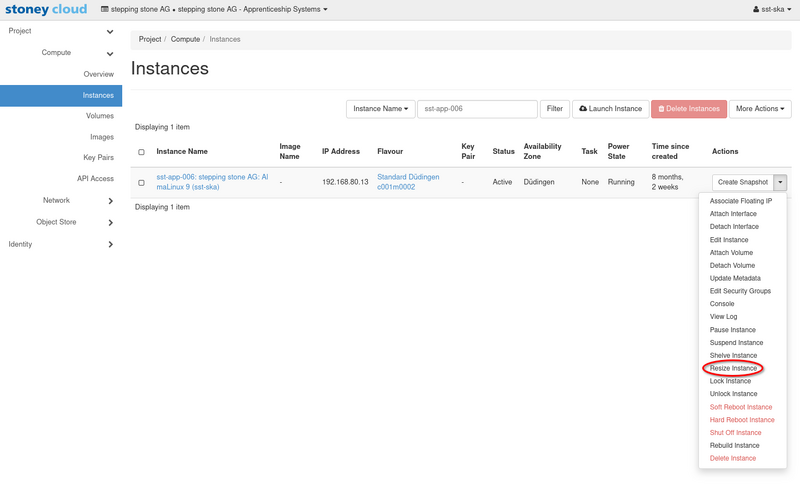
3. Select the VM you would like to resize and open the dropdown menu, by clicking the arrow pointing downwards.

Almalinux 9 VM Resize Dashboard manual 01.png

4. Select Resize Instance from the drop down menu.

Almalinux 9 VM Resize Dashboard manual 02.png

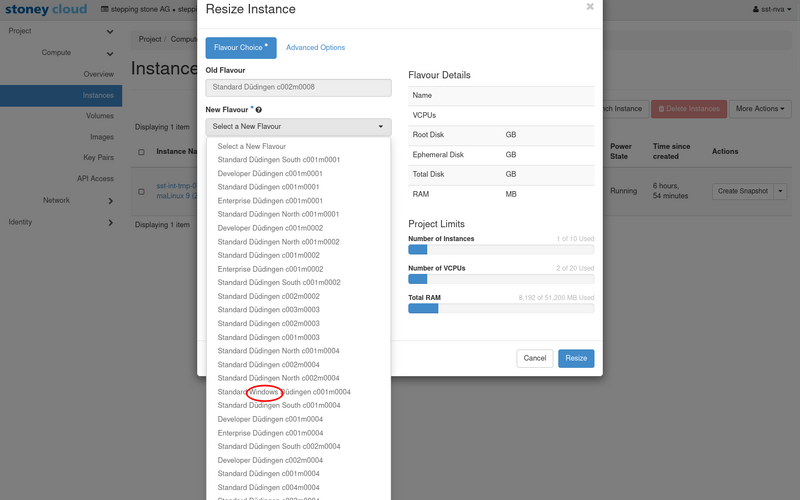
5. A dialog box opens.

  • Click Select a new Flavour.

Almalinux 9 VM Resize Dashboard manual 03.png

  • From the drop down menu, allocate the desired Flavour (For example: Standard Windows Düdingen c001m0002) from the list below by selecting it.

Please ensure that for a Windows VM, a Windows Flavour is selected.

Almalinux 9 VM Resize Dashboard manual 05.png

Click Resize to begin the resizing process of the VM.

Please note that during this process, the VM will reboot